Thursday, 26 September 2013

Constant battle - butternut squash soup

Weight loss is my constant battle. The last few weeks between a bunch of eating out and a sick baby (and momma) I have not been focusing on weight watchers. I've been going to the meetings, which I know have been keeping me from completely going over the deep end. This weeks meeting topic really stuck with me, I guess because at its core it exploited that "what will everyone think" fear. I'm not usually one to care what others think, but lets be honest...I'm human. I DO want others to think good things about me. I've always loved cooking and experimenting, so when my leader posed the question,"how would you feeling you had been secretly filmed on your food choices for the last 12 week?" It really hit me. Proud, for some of it, but ashamed for much of it. Not just that I wasn't eating within my points, but that I really wasn't -enjoying- my food. Not excited, just...blech. 

So, once again, back at it. I wanted to use squash some how since it is in season, and what better way to use it now that it is finally getting cool outside than to make a soup! I pretty much followed the link below but switched oil for cooking spray, and I doubled the recipe and used 4 cups water and 4 cups chicken stock (what is in one of those tetra packs). Any squash that didn't fit in the pan in the water I baked on a baking sheet on the side (peeled and sliced) and that seemed to work ok). It has a nice bit of kick from the ginger which is perfect for battling a cold, which I'm currently doing. I ate it with a dollop of low fat sour cream (do fat free if you are on simply filling!). I count this as 0 pp (just veggies and stock!) and it is simply filling! Enjoy! 


https://www.google.ca/search?q=butternut+squash+soup&ie=UTF-8&oe=UTF-8&hl=en&client=safari

Thursday, 5 September 2013

Too hot but cooking - apples, apples, apples!

I love the fall. The fresh produce, back to school, and the weather cooling off enough to cook in your house. Well... usually it is. For some reason this year we are having freakishly hot weather into September. But I shouldn't complain... The alternative is winter, and I will be wishing for these warm days come January. 

One of the wonderful produce items in the fall is apples. They are fresh, crisp -and- easy on the pocket book. Especially cost effective when you get crab apples from your mom's tree. Thanks mom! 

I love to save money on food, so I've been getting into using my freezer more ever since right before my daughter was born. Most fruit can be frozen with little prep work (some just need washing and freezing like berries). Apples, however, take a bit of work because when you cut them they brown and will continue browning unless you do something to prevent this. There are various ways, but I prefer parboiling. 

The crab apples I get from my mom are too starchy to eat plain. Any apple will work though for this recipe. Wash and cut apples (I use my apple slicer). Bring a big pot of water to boil and then add the apples. Let them boil for 1.5-2 minutes (and if you have to tend to a crying baby like I did, one batch will be mush, but this is ok to save for smoothies since you are blending anyway!). Strain apples and put on a baking sheet with parchment paper. When they have cooled off, put them in the freezer. When frozen, transfer to freezer bags. I like the medium sized ones as that is usually the amount I need. 

How do you use these apples, other than pie (Which is sadly not simply filling)? As I was prepping these apples, I had a brainwave. I had seen the "banana and oats cookies" floating around Facebook, and I remembered a "baked oatmeal" recipe that has been popular at weight watchers before. I combined these ideas and came up with a cakey topping for a apple crisp. Please note: hardcore simply filling-ers will tell you that uncooked oatmeal is not sf. It technically is not, but in my mind, if it is cooked in something it is cooked. And since there aren't a bunch of sf friendly desserts I will let this on slide in my books. Count points for the oats if you want (1/4 of the recipe would have 1/2 cup of dry oats, which would be 4 pp). 


1 package of parboiled apples (or cut up fresh if you want) 
2 cups instant oats
1-2* cups unsweetened apple sauce 
1 egg white
1 tsp vanilla 
1 tsp cinnamon

* the first time I made it I used 1 cup and it was crunchy. I think next time I will try more apple sauce to make it a softer texture 

Put apples in a pan (with parchment or sprayed with an oil spray). Mix remaining ingredients and spread mixture over apes. Bake at 350 for 20 minutes or until crust is done. Makes 4 servings. Please note that the crust is not very sweet, so if you like it very sweet you will have to sweeten how you like. I found the apples made it sweet enough for me :) 

In the photo I served it with fat free plain Greek yogurt! Yum! 

Friday, 30 August 2013

In the groove - chicken noodle soup (base recipe)


Am I crazy to make soup in this ridiculously hot weather? Yes. But I just wanted it so bad that I got through the cooking process so I could enjoy this wonderfully filling and heartwarming dish. 

It is rare that when I make a chicken or turkey that I don't make a stock. I mean why not?! You've basically already gotten your money's worth out of the meat, so a stock seems like bonus! And it is so easy! Take all the bones/skin/etc that you have left after picking off the meat (side note: I love picking off the meat...it is messy yet rewarding!) and throw those extras in a pot. Fill with water and bring to a boil. For a more intense flavour you could add carrots, onions and celery, but I usually don't have time to fiddle with that. Boil until the broth has a yellowy brown colour (the darker it is, the more concentrated the flavour will be). Strain the liquid into a container and discard the bones etc. Put the broth in your fridge or cold room. I usually leave it overnight for good measure. The next day you will be able to remove the fat layer from the top and you will be left with the gelatinous stock! 

To start any sort of broth soup I always start with the trinity of carrots, celery and onion. If you want peppers I would add them here as well. Sauté veggies in a little oil until tender and the onions are opaque. 

Next I add in my stock and bring to a boil. Today I wanted simple so I only seasoned with salt and pepper but I have often added rosemary, thyme and sage to taste. And really, you could add whatever you want! Lemongrass, red pepper flakes...ideas are endless. Be brave! 

Next I added in my precooked chicken (the leftovers you saved before making your broth) and (whole wheat) noodles or (brown) rice. If you want it to be thicker cook the noodles right in the soup, if you rather it be thinner cook them in a separate pot and add right at the end. I hate dishes, so you can guess which option I decided on! Also, remember that brown rice (unless it is minute rice) takes a long time to cook, plus it soaks up liquid so you might have to add some more broth or water to compensate. I even had to add a bit for my noodles!

Continue to taste the broth throughout the cooking process, as you may need to add more salt. You don't want it to taste salty, but no salt leaves it a bit bland in my opinion. At the end of cooking I added shredded zucchini (didn't want it to get too soft) and once that was cooked my soup was done! Now to try and cool my house off! Happy soup making! 

Wednesday, 28 August 2013

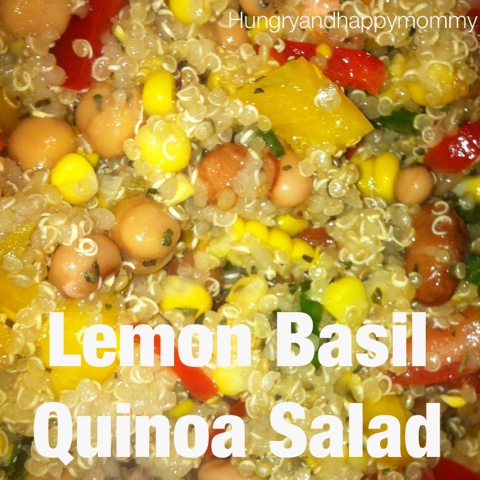
Summer's end - Lemon basil quinoa salad


As summer comes to an end it gives me a chance to start over with the school year. My husband and I are both teachers (I'm off on mat leave currently) so September has always been a time for us to recharge our lifestyles and leave the gluttony of the summer behind. With school comes structure, so I will use this time of year to get into my own routine at home. 

This week I decided to do simply filling on some days and count points plus on others. I love the flexibility of weight watchers! Today is a simply filling day so I looked through my Pinterest board and found this recipe: 

http://www.thegardengrazer.com/2013/02/quinoa-vegetable-salad-with-lemon-basil.html

I petty much followed the recipe to a T so I won't copy and paste it. I didn't have a can of chickpeas/garbanzo beans so i just used a bean medley I had in my cupboard and it worked fine. I used dried basil but I can see how fresh would be way better. In my next life I will have a herb garden haha. I divided the recipe into 3 generous portions so that it would include 2 tsp oil (1 tablespoon = 3 teaspoons, so the recipe contains 6 teaspoons). 


Friday, 16 August 2013

Freezer clean up - French toast

We are slowly gearing up to move to our new house that is being built right behind us. It is awesome to see it go up, but I truly believe it is torture to have to wait. I was looking for things I can do to make the move easier without packing everything RIGHT NOW (like I want to). So the freezer became the outlet to my frustration. 

When I was done organizing I realized we have waaay too much bread. I think part of it is that I stopped eating most bread products except for light bread so that meant my husband was left to eat all the regular bread,English muffins, wraps, etc. and there are only so many carbs one man can eat! As I was trying to think of ways to use it up other than sandwiches, I remembered the first meal I ever made my husband when we were dating: French Toast! This time though, I made sure to cook it all the way through :P 

Simply Filling French Toast 
Serves 2 

3 eggs 
Splash of fat free milk 
1 tsp vanilla 
1 tsp cinnamon 
6-8 pieces of light bread 
(I used 3 regular slices for hubby, 3 light for me) 

Mix everything except bread in a bowl with a whisk. 

Coat both sides of each slice of bread with the mixture and cook on medium heat. 

Brown both sides. Serve with powdered sugar or syrup (add points for these) and fruit. 


Monday, 5 August 2013

Rainy day - dairy free ranch dip

The day started off hot and humid, so it was inevitable that this would be the rest of the day: 

I had tried out making dip the other day with a can of chickpeas I had in the cupboard and have been enjoying it at least once a day. It is almost done so I started thinking about what other dips and/or spreads I could make with beans. I had made some small white beans in my slow cooker (rinse, put in crock pot, fill with water. Cook on high for 5-8 hours depending on the type. The only one not recommended is kidney beans since you don't get them hot enough to get rid of toxins.) 

I grabbed a 2 cup bag of white beans out of my freezer and let them defrost in the freezer bag in some water in the sink. When they were ready I put 1/2 in my magic bullet (if you have a regular blender, do them all at the same time). I put water (about half way full) and 1/2 a package of ranch dip mix. Now, this technically has milk ingredients in it, so if you are being very strict you might use one of these recipes I found on Pinterest for the spice combinations (which I think I will do next time!) : 

http://m.allrecipes.com/recipe/16131/ranch-dressing-ii?crlt.pid=camp.YIS9q6d0
(Minus the sour cream and mayo) 
Or this one: 


Blend and enjoy! I ended up adding more water to it to make more of a dressing consistency but you don't want to add to much, as it will start tasting grainy from the beans. I did the rest of the beans and mix and stored it all in a large container in the fridge (makes about 4 cups, depending on consistency). If you dont have to avoid milk, some greek yogurt or fat free milk in place of water would taste wonderful! Enjoy! 


Saturday, 3 August 2013

Lost post - cutting a watermelon

(I thought I had posted this, but it seems I didn't save anything!) 

If summer had to be associated with a fruit it would have to be watermelon. Juicy, crisp, refreshing and sweet, this just isn't quite as amazing as it is in the summer! 

I recently learned how to cut up a watermelon so I thought I'd share in pictures: 


Enjoy! 


Quick post - Quick hummus


I will try not blabber much in this post, but rather leave you with a loose recipe for a dip I've been fiddling with. I have a bunch of canned beans that I'm trying to use up, as I've started using dried instead (less sodium and cheaper) which I will post a how-to later. I picked out the chick peas, determined to make a hummus type dip. I peeled a couple of pieces of garlic and stuck them in the oven at 350 while I was making supper, turning once to brown both sides. When I took them out I was able to squish them into my magic bullet and the garlic came out like a paste. I added a bit of water and about 2 tablespoons of roasted garlic and peppers seasoning from club house and blended for a minute. I could probably write a whole post just on this stuff...it is good on everything! 


Next I rinsed the can of chickpeas (also known as garbanzo beans) and added them to the blender. I topped it off so the water and a few squirts of lemon juice  covered the chickpeas. To make a creamier dip add some plain fat free yogurt (or Greek for extra thick) and/or healthy oil. It goes without saying, the more liquid you add the thinner it will be, so it is better to underestimate than over. Mine turned out a bit thinner but it works for what I want to use it for! I also considered adding a bit more liquid to make a simply filling salad dressing, so I will update if that works out. It is also good to note that this dip tastes better the next day. 

Makes about 2 cups of dip. Free on simply filling! 


Thursday, 1 August 2013

Dairy trials - potato crusted quiche


A while back I was watching Diners, Drive-ins and Dives (a food network show) and a restaurant served a potato crust quiche instead of a flakey pastry one. It hit me that it should be fairly easy to make into a simply filling dish! Mine isn't be as rich as theirs (they used heavy cream in the eggs!) but I was determined to make it tasty! 

You may have noticed that my previous recipes have been dairy free. This has been due to the fact that my daughter was reacting to it through the breast milk she was getting, so I had to cut it out temporarily. I have been testing different things out and it seems it doesn't bother her anymore, so I will be slowly making the switch back. That being said, the only fat free cheese that I can find is the Kraft singles, and frankly I don't really like the taste or texture (except maybe in grilled cheese) so many of my recipes will use other fat free milk ingredients...or none at all. 

I started off with these ingredients: 

- 3 medium potatoes, washed and shredded 
- Oil spray 
- Veggies of your choice (anything really goes! I did a few mushrooms and 1/2 each of a red and orange pepper. I was going to add green onion or onion flakes but forgot!) 
-Dry/fat free cottage cheese (this is the lowest fat one I could find, see pic) 
- salt, pepper and/or seasonings of your choice (I added dill) 
- fat free meat (optional, I didn't use any) 
- 5-6 eggs scrambled (I used 6) 

How it comes together: 

Preheat oven to 400F. Shred washed potatoes and pat dry with paper towel or cloth. Spray pie plate with oil spray, then form shredded potato into a crust. Spray the top and bake for 15-20 minutes until golden brown (might take longer). 

While it cooks, sauté veggies. 

Turn oven down to 350F. Add veggies, 1/4 to 1/2 of the container of cottage cheese (1/2 to 1 cup) then top with eggs. Season with seasonings. 

Bake for 25-30 minutes or until middle is cooked. Alive into 6 or 4 pieces depending on how hungry you are! 


Wednesday, 31 July 2013

You are my Sunshine - Cabbage Rolls


I woke up with determination today to clean my whole house. And I mean CLEAN. But I must have been delusional that I would be able to do it all with my munchkin needing me (although my hubby did watch her most of the day so I could get some work done, but I still needed to take breaks with her). By late afternoon my husband needed to go out to do some jobs outside, and I wanted to make cabbage rolls for supper... So the entire time I sang to her just to keep her happy in her chair. Now I've got "you are my sunshine" stuck in my head, but hey! Supper got in the oven, so my mission is accomplished! 

I looked through cookbooks and couldn't really find a recipe I liked the looks of, so I pulled parts of each together then just winged it. Here's how it goes: 

Ingredients: 
1 head of sour cabbage 

2 cups brown rice + 3.5 cups water (makes about 4+ cups of rice) 

1 onion diced finely 
Salt and pepper (1 tsp each...or to taste) 
2 lb extra lean ground beef (I had a pack with a little less than that) 

2-3 eggs

680 ml tomato sauce (largest no name brand can) 
1/2 of tomato sauce can of water 
3 tablespoons sugar (this will add 1 pointsplus for 2-3 rolls. Splenda would work to make it 0) 
2 tablespoons vinegar 

Instructions:

Soak cabbage in cool water for a few hours. I started it in the morning, then dumped the water and added new water in the afternoon. Then a few hours later I rinsed it.


Make your rice as directed on the package. If you want it to be simply filing use brown rice of some sort. I used short grain from superstore that comes in a small yellow no name bag. 2 cups of rice make more than the 4 cups you need, but honestly it would be ok if you added it all. I saved my extra for a leftover meal for later. 


Sauté onion in a pan. When they are clear, put them to the side and brown your ground beef in the pan as well as the salt and pepper. If you continue to stir the meat it will cook up in smaller pieces, rather than large clumps (which usually happens when I'm making taco meat for some reason... I always get distracted making other toppings I think). Mix the onions in with the meat and set aside to cool. While it cools, separate your cabbage into leaf "cups" and set aside. 

Mix tomato sauce, sugar and vinegar in a bowl. (Note: when we ate them, hubby and I agreed the sauce needed some salt to get rid of the bitterness of the tomatoes). Put a bit of the mixture in the bottom your pan to prevent sticking. Since it is usually just my husband and I for supper, I decided to divide the recipe into 4 small pans and freeze 3 of them for later. I love freezer cooking/batch cooking so when I have a chance I try to divide recipes by 4 or 2. This helps us waste less and not have leftovers for a week! 

Next, place some of the meat mixture in a cabbage cup. Fold,  much like you would fold a burrito (see pictures below). Also, sometimes the cabbage cups have very hard ends (where they connected to the core) so make sure to trim those off as much as possible, as they make it hard to fold and they aren't pleasant to eat. 

Place finished rolls in pan and cover with remaining sauce. Cover and bake 350 F for 45 minutes. 

I served these with pork, so I ended up only eating 1 because they are so filling. I think they would be a great meal by themselves with a salad (pictured). Enjoy!


Tuesday, 30 July 2013

Doing a favor - zucchini cake pancakes (no sugar, no sweetener, no gluten)

Yesterday my mother-in-law came for some snuggle time with my daughter and brought with her a zucchini and asked if I would make a cake, since she didn't have some of the supplies. So I grabbed a random recipe and got cooking. While it was baking my house started to fill with the wonderful scent that is zucchini cake. Knowing it would eat up (no pun intended) my weekly points if i started having "just one piece" I started looking for an alternative. I had heard of savory potato pancakes, savory zucchini pancakes and paleo banana pancakes, but I could not find anything like zucchini cake.  So I started mixing. 

I started with a base of 2 eggs like many banana and zucchini pancake recipes I looked at had. Then I added 1/4 tsp allspice and 1 1/2 - 2 tsp of cocoa an beat that together. 
 
Next I added in 1/2 a mashed banana (I just mashed it with my hands before I added it to the mixture) and 1 cup zucchini. I heated a frying pan, sprayed it with oil and divided it into 4 pancakes about the size of my palm. I was careful to really let them cook fully before flipping to avoid breakage. They don't look that pretty but they tasted good. I am going to play with my recipe a bit and see if I can get it to be a bit less eggy and might also try baking them in a silicon baking tray. I will post updates, but for now I'm full so I won't make anymore! 
* if counting points I would personally only count the eggs (4 pp). 

Time saving - overnight slow cooker oatmeal with quinoa

I'm always looking for ways to save time but still eat healthy. That's why I tend to use my slow cooker lots! I haven't had a chance to use it much lately since we have been on the go (camping in non-electric sites) so it was nice to be able to get back in the groove of using this appliance. 

I have done slow cooker overnight steel cut oats a few times, and from the research I did the best general rule is this: 1 cup of oats to 4 cups of liquid, cook on high for 2 hours then turn on "keep warm" and go to bed. If you keep cooking it on low or high it tends to burn. And thanks to my mommy brain, I found out today that if you turn it off instead of "keep warm" it still works, you just have to heat a portion in the microwave when you get up. 

I have been hungry lately... Like hungry hippo hungry... So I've been looking at ways to feel fuller, especially in the mornings since my daughter gets me up quite early most days, plus nursing tends to make me ravenous after not eating for that many hours. Eggs are usually my go-to but I was getting sick of those so I thought I'd revisit 
oatmeal again. My cousin had mentioned quinoa prepared as a hot cereal, and this intrigued me since I knew that quinoa is a complete protein. So in searching google, I found this recipe to try and pretty much stuck to it, so I won't retype it here, but just tell you the changes or adaptations I tried and leave you with the link to the original recipe: 

http://mindfulnutritionforlife.com/2012/01/crockpot-quinoa-oatmeal-oh-yum/

1. I left out the coconut oil and sweetener. I don't doubt the health benefits of the oil, but adding either of these ingredients makes it difficult to count points (I would actually have to have a specific portion rather than taking only what I need). If I feel like adding them I would add what I wanted to a portion I was eating. 

2. I used my cooking instructions: 2 hours on high, then "keep warm" or off for the night. DON'T open it until you are ready to eat. Stir in the morning and reheat if needed. refrigerate leftovers and reheat as needed. This makes a great "dessert" when you want something warm and sweet. Add fat free cool whip if you are feeling rebellious ;) 

3. Adaptations I have tried: 

- the first time I made it I had Saskatoon berries in the fridge needing to be used. I used extra vanilla in place of the cinnamon in the recipe. Turned out good, but it made me remember I really don't care for cooked saskatoons :/ oops! 


- the second time I made it I used apples. Next time I'd add more cinnamon, but I like a lot of cinnamon. This one was much better, but I do love apple pie so that's probably why I liked this the best. 


- next I would like to try a zucchini bread inspired recipe... I will edit this post if I ever try it! Or maybe banana bread... Oh the possibilities...

One last little note: there is debate in the weight watcher community if steel cut oats count on simply filling. Technically they don't which I think is bogus. I track it as hot cereal (listed as a power food). Also, to make it truly simply filling, you will have to use soy milk or fat free milk, but since I can't have either, I tend to look the other way when I use almond milk in recipes. It is just how I work the plan for my individual situation, which I think ultimately everyone does. 

http://en.wikipedia.org/wiki/Quinoa

Friday, 26 July 2013

Mommy time - burnt omelette

I'm a bit new to this mommy gig (almost 4 months... where has the time gone) so my intentions to, say, make breakfast get interrupted and I'm getting used to that. Yesterday morning was one of those days! I started my bell peppers and ham in a non stick pan and once they were cooked I added 3 scrambled eggs. Then my daughter needed me and before I knew it my omelette was burning! Oh well. I ate it because a) I hate wasting good food (ESP my yummy Hutterite eggs) and b) I had a clingy baby. It would work out to be 7-8 pp depending on how much ham and free on simply filling. 


Today I had to switch to pointsplus since we were eating out for two meals. I made a batch of black bean mango salad and portioned it out for the next few days, especially for tomorrow when we go to visit my brother and his girlfriend at the lake. I will report back how that goes! 

Wednesday, 24 July 2013

Berry picking - egg salad sandwich and cucumber tomato salad

We headed out this morning to catch the tail end of the Saskatoon berry season. Yummy, and 0 points :) 

We decided to grab a quick lunch before heading to the city for groceries. In retrospect I would have added an extra egg and pack a more filling snack than an apple (I spent 4 wp on an emergency granola bar I had in my purse). The sandwich has 2 eggs, 2 slices of light bread, and 1 tbsp miracle whip (1 wp). The salad had Greek seasoning, balsamic vinegar, mini cucumbers and grape tomatoes.